How to Apply Your Vinyl Decal
All decals will come with written instructions (shown below near the bottom of the page) as well as a small practice decal. Please be sure to read over ALL of the instructions before applying your decal. Below you will find pictures and videos showing how to apply your decal. You can choose which application method is right for you based on the size and shape of your decal. Most decals can be applied dry if you are using the correct method. Wet application should be used only when absolutely necessary.
Always be sure to clean the area you will be applying the decal to before you get started. The decal will not stick as well to oily or waxy surfaces (including vehicles and boats) so be sure you have removed any such substances from your surface before applying your decal. Ammonia based cleaning products, such as Windex, should be avoided as the ammonia may interfere with the adhesive on your decal. Rubbing alcohol and a lint free cloth should do the trick for a simple application.
Always be sure to clean the area you will be applying the decal to before you get started. The decal will not stick as well to oily or waxy surfaces (including vehicles and boats) so be sure you have removed any such substances from your surface before applying your decal. Ammonia based cleaning products, such as Windex, should be avoided as the ammonia may interfere with the adhesive on your decal. Rubbing alcohol and a lint free cloth should do the trick for a simple application.
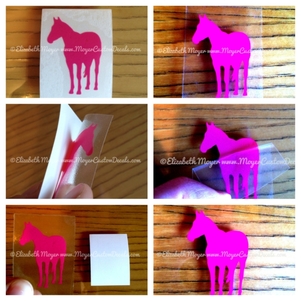
The Basics of How a Die-cut Decal Works:
How to Apply a Decal (center tape hinge method)
Basic Decal Application (Top Hinge)
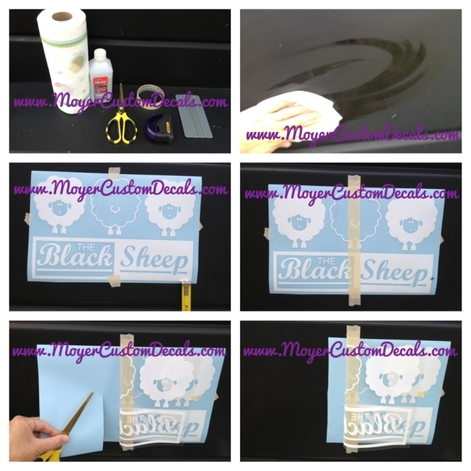
Decal Application Using a Side Hinge
This method works well for longer, rectangular shaped decals.
Decal Application Using a Center Hinge
Another method that works well for very long decals.
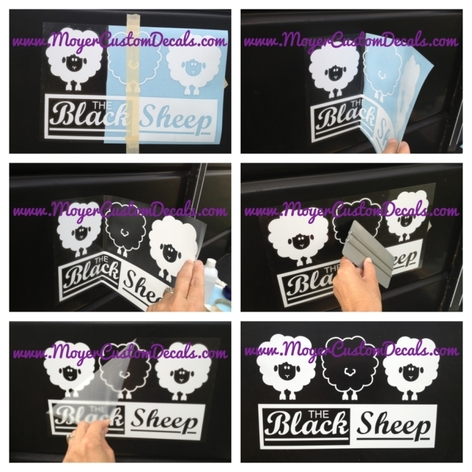
Wet Application of a Decal
Wet application technique should NEVER be used for reflective decals as it may delaminate the material.
This method should only be used when absolutely necessary. For most decals a dry application using one of the methods above is best.
This method works well for large decals as well as for smaller decals that need to be very precisely placed. When applying a decal to a wet surface you will have a brief period of time to slide the decal around and maneuver it into place. Try to use as little fluid as you can and still be able to adjust the decal. This method can also be combined with the tape-hinge methods. Simply spray down your area after you have applied your tape-hinge and before you begin to squeegee the decal down. A simple solution of water combined with a drop or so of liquid dish soap is used. Be aware that the adhesive on the transfer tape will begin to pull away from the transfer tape as well as the decal as it begins to dry out. Be sure to give your decal plenty of time to dry.
If you are working with a very large decal you may wish to apply it in sections. After you have leveled and centered you decal and after you have applied your tape hinge across the top so that the whole decal is held securely in place, you can cut the decal into smaller sections. Just be sure not to cut through your tape hinge or the vinyl. Once you have cut the decal, you can then peel the backing off a single smaller section and lay that section down before moving on to the next. You can also use the wet application method with this. Simply spray the area under the section of the decal you are working with before squeegeeing the decal.
Written Instructions Included with Decals
How to Apply Your Vinyl Decal
Step One: Surface Preparation
Clean the destination surface with rubbing alcohol and dry it thoroughly. The vinyl will not stick well to oily or waxy surfaces. If you're applying the decal to glass, DO NOT use Windex or other ammonia-based cleaners; the ammonia may interfere with the adhesive. To make application easier, try not to apply decals at temps. below 45 degrees or in windy conditions.
Step Two: Vinyl Decal Preparation
The product is made of three layers: the backing paper, the vinyl decal, and the clear transfer “tape“. The vinyl decal may have pulled away from the transfer tape during shipping. Place the product on a smooth flat surface such as a table. Take a credit card and use the edge to rub across the entire image. Start from the center and work out to the edges. This action will adhere the vinyl decal to the transfer tape.
Step Three: Position the Vinyl Decal
Place the product on the destination surface. Level and center it. Pay special attention to level and center the vinyl decal inside and not the backing paper or transfer tape.
Step Four: Remove the Backing Paper
Using masking tape, tape one side of the backing paper/transfer tape to the destination surface. Lift the other side up using the tape as a hinge. At an angle, slowly peel away the backing paper underneath without touching the sticky vinyl. The decal should stay adhered to the transfer tape. If it starts to separate, help it stay together. Once the vinyl has touched the surface you will not have a chance to adjust the placing. After the backing paper is removed, slowly roll the sticky vinyl and transfer tape onto the destination surface starting from the tape hinge-side. Go slowly and “squeegee” the decal down with a credit card as you go.
Step Five: Secure the Vinyl Decal to the Surface
After the image is on the surface, use your credit card and lightly rub the transfer tape from the center of your image to the edges to help remove any air bubbles. Again, rub the entire image applying pressure to adhere the vinyl to the surface.
Step Six: Finish!
Gently peel away the transfer tape starting from one corner and pulling down at a tight angle across the decal. Go slow and be patient. Once the transfer tape is removed you are done. If there are any air bubbles that cannot be removed by pushing them to the edge, you can prick the vinyl with a pin. This will let the air out from under the vinyl and a pin prick will not be noticeable. Most times air bubbles will disappear on their own after a week or so if in the sun.
A small sample decal is provided for you to practice with.
